v-for-exer.html
<!DOCTYPE html>
<html lang="en">
<head>
    <meta charset="UTF-8">
    <meta http-equiv="X-UA-Compatible" content="IE=edge">
    <meta name="viewport" content="width=device-width, initial-scale=1.0">
    <title>Document</title>
    <script src="http://cdn.jsdelivr.net/npm/vue"></script>
    <style>
        /* 화면에 렌더링 할 때 사용할 제목의 색상을 파란색으로 정의 */
        .blue_style {color: blue}
    </style>
</head>
<body>
    <div id="app">
        <h1>윤고랭이가 좋아하는 과일은?</h1>
        <ul>
            <!-- v-for를 통해서 반복문으로 aFruits 과일 배열 데이터를 가져옴 -->
            <li v-for="(items, index) in aPersons">
                <!-- aFruits 안의 항목을 하나씩 꺼내서 HTML로 렌더링 -->
                <p>번호 : {{ index }}</p>
                <p>이름 : {{ items.name }}</p>
                <p>나이 : {{ items.age }}</p>

            </li>
        </ul>
    </div>
    <script>
        Vue.config.devtools=true;
        //F12 개발자모드 출력
    var app = new Vue({
        el : '#app',
        data : {
            aPersons: [
                {
                    name : '홍길동',
                    age : 27
                },
                {
                    name : '이순신',
                    age : 30
                },
                {
                    name : '강감찬',
                    age : 35
                }
            ]
        }
    });
    </script>

</body>
</html>
for...in:
반복문은 객체의 모든 열거 가능한 속성애 대해 반복
기본적인 for문과는 다르지만, 프로퍼티를 순회 할 수 있도록 합니다.
루프마다 객체의 열거할 수 있는 프로퍼티의 이름을 지정된 변수에 대입
for(변수 in 객체) {
객체의 모든 열거할 수 있는 프로퍼티의 개수만큼 반복적으로 실행하고자 하는 실행문;
}
<li v-for="(items, index) in aPersons">
items,index는 변수이고 aPersons라는 객체
::결과화면
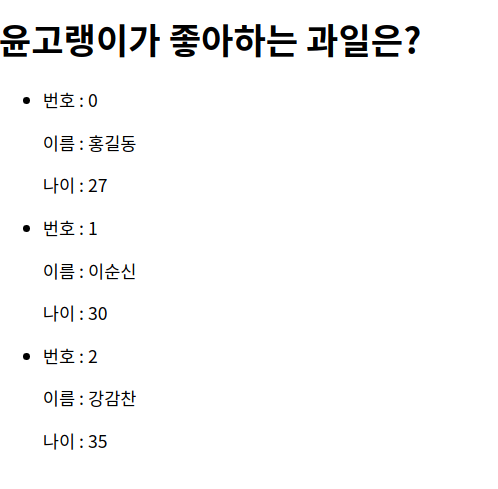
프로퍼티 개수만큼 실행됨.
computed.html
<!DOCTYPE html>
<html lang="en">
<head>
    <meta charset="UTF-8">
    <meta http-equiv="X-UA-Compatible" content="IE=edge">
    <meta name="viewport" content="width=device-width, initial-scale=1.0">
    <title>Document</title>
    <script src="http://cdn.jsdelivr.net/npm/vue"></script>
    <style>
        /* 화면에 렌더링 할 때 사용할 제목의 색상을 파란색으로 정의 */
        .blue_style {color: blue}
    </style>
</head>
<body>
    <div id="app">
        <p>원본 문장 : "{{ sOriginalMessage }}"</p>
        <p>대문자 변환 문장 : "{{ fnUpperCaseMsg }}"</p>
    </div>
    <script>
        Vue.config.devtools=true;
    new Vue({
        el : '#app',
        //data는 메스태시 안에 넣을 값이 간단할 때 사용
        data : {
            sOriginalMessage : 'How are you?'
        },
        // computed는 머스태시 안에 넣을 JS 로직이 복잡할 때 사용
        computed: {
            fnUpperCaseMsg: function() {
                return this.sOriginalMessage.toUpperCase();
            }
        }

        // computed 속성
        // 머스태시에 작성할 로직이 복잡하면 함수로 정의할 때
        // 계산량이 많아서 캐시가 필요할 때

        // methods 속성
        // 뷰의 이벤트 핸들러 로직을 함수로 정의할 때
    });
    </script>

</body>
</html>
computed :
템플릿 내에 표현식을 넣으면 편하다. 하지만 간단한 연산 일때만 이용하는 것이 좋은데,
왜냐하면 너무 많은 연산을 템플릿 안에서 하면 코드가 비대해지고 유지보수가 어렵다.
복잡한 로직이면 사용하는게 computed 속성
component_basic.html
<!DOCTYPE html>
<html lang="en">
<head>
    <meta charset="UTF-8">
    <meta http-equiv="X-UA-Compatible" content="IE=edge">
    <meta name="viewport" content="width=device-width, initial-scale=1.0">
    <title>Document</title>
    <script src="http://cdn.jsdelivr.net/npm/vue"></script>
    <style>
        .fruit_style {
            border : 1px solid #ccc;
            background-color: white;
            padding-left : 1em;
        }
    </style>
</head>
<body>
    <div id="app">
        <h1>{{ sTitle }}</h1>
        <favorite-fruits></favorite-fruits>
        <favorite-fruits></favorite-fruits>
    </div>
    <script>
        Vue.config.devtools=true;
        Vue.component('favorite-fruits',{
            data: function() {
                return {
                    aFruits :
                [
                    { sFruitName : '사과'}
                    ,{ sFruitName : '오렌지'}
                    ,{ sFruitName : '수박'}
                ]
                }
            },
            template:`
            <div>
                <div v-for="item in aFruits" class = "fruit_style">
                    <p>좋아하는 과일 : {{ item.sFruitName }}</p>
            </div>
                <br>
            </div> `
        })
    new Vue({
        el : '#app',

        data : {
            sTitle : 'How are you?'
        }
    });
    </script>

</body>
</html>
template :
HTML, CSS 등의 마크업 속성과 뷰 인스턴스에서 정의한 데이터 및 로직들을 연결하여
사용자가 브라우저에서 볼 수 있는 형태의 HTML로 변환해 주는 속성입니다.
<div>
<div v-for="item in aFruits" class = "fruit_style">
<p>좋아하는 과일 : {{ item.sFruitName }}</p>
</div>
<br>
</div> `
이 형태를 HTML로 변환해줘서 보여준다.
머스태시를 쓸 수 있다.

methods.html
<!DOCTYPE html>
<html lang="en">
<head>
    <meta charset="UTF-8">
    <meta http-equiv="X-UA-Compatible" content="IE=edge">
    <meta name="viewport" content="width=device-width, initial-scale=1.0">
    <title>Document</title>
    <script src="http://cdn.jsdelivr.net/npm/vue"></script>
    <style>
        /* 화면에 렌더링 할 때 사용할 제목의 색상을 파란색으로 정의 */
        .blue_style {color: blue}
    </style>
</head>
<body>
    <div id="app">
        <p>클릭 숫자   : {{ nClicks }}</p>
        <p>카운트 다운 : {{ fnCounter }}</p>
        <button v-on:click="fnIncrement"> 눌러줘 </button>
    </div>
    <script>
        Vue.config.devtools=true;
    new Vue({
        el : '#app',

        data : {
            nClicks: 0
        },
        computed: {
            fnCounter: function() {
               return 10 - this.nClicks
               //클릭 할 때마다 차감이 된다.
            }
        },
        methods : {
            fnIncrement() {
                this.nClicks++;
                //methods 렌더링이 일어날때마다 항상 실행
            }
        }

    });
    </script>

</body>
</html>
methods:
종속된 값이란 개념없이 렌더링이 일어날 때마다 계속 호출이 된다.
그러면 computed와 다른 점은 뭘까
computed는 계산해야하는 목표 데이터를 정의하는 '선언형' 프로그래밍 방식
종속 대상의 변경이 일어나기 전까지는 호출이 되지 않고
methods는 렌더링이 일어날 때마다 항상 함수를 실행합니다.
computed는 반환하는 결과를 캐싱 해줍니다.
하지만 헤비, 무거운 로직이라면 렌더링이 일어날 때마다 항상 실행하는 methods보단
computed 속성으로 구현하는게 더 좋다.